DI 实用技巧
依赖注入
依赖注入是一个用来管理代码依赖的强大模式。本文会讨论 Angular 依赖注入的许多特性。
要获取本文的代码,参见在线例子 / 下载范例。
应用程序全局依赖
在服务本身的 @Injectable() 装饰器中注册那些将被应用程序全局使用的依赖提供商。
src/app/heroes/hero.service.3.ts
content_copyimport { Injectable } from '@angular/core';
import { HEROES }     from './mock-heroes';

@Injectable{
  // we declare that this service should be created
  // by the root application injector.

  providedIn: 'root',
})
export class HeroService {
  getHeroes() { return HEROES; }
}
这里的 providedIn 告诉 Angular,要由根注入器负责创建 HeroService的实例。 所有用这种方式提供的服务,都会自动在整个应用中可用,而不必把它们显式列在任何模块中。
这些服务类可以充当自己的提供商,因此你只要把它们定义在 @Injectable 装饰器中就算注册成功了。
提供商是用来新建或者交付服务的。 Angular 拿到“类提供商”之后,会通过 new 操作来新建服务实例。 从依赖注入一章可以学到关于提供商的更多知识。
现在你已经注册了这些服务,这样 Angular 就能在应用程序的任何地方,把它们注入到任何组件和服务的构造函数里。
外部模块配置
如果某个提供商不是在服务的 @Injectable 装饰器中配置的,那么就要在根模块 AppModule 中把它注册为全应用级的提供商,而不是在 AppComponent 中。 一般来说,要在 NgModule 中注册提供商,而不是在应用程序根组件中。
下列情况下会用到这种方法:1. 当用户应该明确选择所用的服务时。2. 当你要在惰性加载的上下文中提供该服务时。3. 当你要在应用启动之前配置应用中的另一个全局服务时。
下面的例子就属于这些情况,它为组件路由器配置了一个非默认的地址策略(location strategy),并把它加入到 AppModule 的 providers 数组中。
src/app/app.module.ts (providers)
content_copyproviders: [
  { provide: LocationStrategy, useClass: HashLocationStrategy }
]
@Injectable和嵌套服务依赖
这些被注入服务的消费者不需要知道如何创建这个服务,它也不应该在乎。新建和缓存这个服务是依赖注入器的工作。
有时候一个服务依赖其它服务...而其它服务可能依赖另外的更多服务。按正确的顺序解析这些嵌套依赖也是框架的工作。 在每一步,依赖的使用者只要在它的构造函数里简单声明它需要什么,框架就会完成所有剩下的事情。
下面的例子往 AppComponent 里注入的 LoggerService 和 UserContext。
src/app/app.component.ts
content_copyconstructor(logger: LoggerService, public userContext: UserContextService) {
  userContext.loadUser(this.userId
  logger.logInfo('AppComponent initialized'
}
UserContext 有两个依赖 LoggerService(再一次)和负责获取特定用户信息的 UserService。
user-context.service.ts (injection)
content_copy@Injectable()
export class UserContextService {
  constructor(private userService: UserService, private loggerService: LoggerService) {
  }
}
当 Angular 新建 AppComponent 时,依赖注入框架先创建一个 LoggerService 的实例,然后创建 UserContextService 实例。UserContextService 需要框架已经创建好的 LoggerService 实例和尚未创建的 UserService 实例。 UserService 没有其它依赖,所以依赖注入框架可以直接 new 一个实例。
依赖注入最帅的地方在于,AppComponent 的作者不需要在乎这一切。作者只是在(LoggerService 和 UserContextService 的)构造函数里面简单的声明一下,框架就完成了剩下的工作。
一旦所有依赖都准备好了,AppComponent 就会显示用户信息:

@Injectable() 注解
注意在 UserContextService 类里面的 @Injectable() 装饰器。
user-context.service.ts (@Injectable)
content_copy@Injectable()
export class UserContextService {
}
@Injectable 装饰器会向 Angular DI 系统指明应该为 UserContextService 创建一个实例还是多个实例。
把服务作用域限制到一个组件支树
所有被注入的服务依赖都是单例的,也就是说,在任意一个依赖注入器("injector")中,每个服务只有唯一的实例。
但是 Angular 应用程序有多个依赖注入器,组织成一个与组件树平行的树状结构。所以,可以在任何组件级别提供(和建立)特定的服务。如果在多个组件中注入,服务就会被新建出多个实例,分别提供给不同的组件。
默认情况下,一个组件中注入的服务依赖,会在该组件的所有子组件中可见,而且 Angular 会把同样的服务实例注入到需要该服务的子组件中。
所以,在根部的 AppComponent 提供的依赖单例就能被注入到应用程序中任何地方的任何组件。
但这不一定总是想要的。有时候你想要把服务的有效性限制到应用程序的一个特定区域。
通过在组件树的子级根组件中提供服务,可以把一个被注入服务的作用域局限在应用程序结构中的某个分支中。 这个例子中展示了为子组件和根组件 AppComponent 提供服务的相似之处,它们的语法是相同的。 这里通过列入 providers 数组,在 HeroesBaseComponent 中提供了 HeroService:
src/app/sorted-heroes.component.ts (HeroesBaseComponent excerpt)
content_copy@Component{
  selector: 'app-unsorted-heroes',
  template: `<div *ngFor="let hero of heroes">{{hero.name}}</div>`,
  providers: [HeroService]
})
export class HeroesBaseComponent implements OnInit {
  constructor(private heroService: HeroService) { }
}
当 Angular 新建 HeroBaseComponent 的时候,它会同时新建一个 HeroService 实例,该实例只在该组件及其子组件(如果有)中可见。
也可以在应用程序别处的不同的组件里提供 HeroService。这样就会导致在不同注入器中存在该服务的不同实例。
这个例子中,局部化的 HeroService 单例,遍布整份范例代码,包括 HeroBiosComponent、HeroOfTheMonthComponent 和 HeroBaseComponent。 这些组件每个都有自己的 HeroService实例,用来管理独立的英雄库。
休息一下!
对一些 Angular 开发者来说,这么多依赖注入知识可能已经是它们需要知道的全部了。不是每个人都需要更复杂的用法。
多个服务实例(sandboxing)
在同一个级别的组件树里,有时需要一个服务的多个实例。
一个用来保存其伴生组件的实例状态的服务就是个好例子。 每个组件都需要该服务的单独实例。 每个服务有自己的工作状态,与其它组件的服务和状态隔离。这叫做沙箱化,因为每个服务和组件实例都在自己的沙箱里运行。
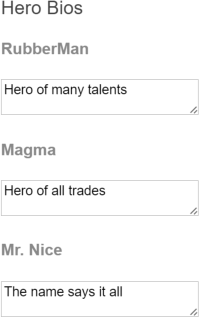
想象一下,一个 HeroBiosComponent 组件显示三个 HeroBioComponent 的实例。
ap/hero-bios.component.ts
content_copy@Component{
  selector: 'app-hero-bios',
  template: `
    <app-hero-bio [heroId]="1"></app-hero-bio>
    <app-hero-bio [heroId]="2"></app-hero-bio>
    <app-hero-bio [heroId]="3"></app-hero-bio>`,
  providers: [HeroService]
})
export class HeroBiosComponent {
}
每个 HeroBioComponent 都能编辑一个英雄的生平。HeroBioComponent 依赖 HeroCacheService 服务来对该英雄进行读取、缓存和执行其它持久化操作。
src/app/hero-cache.service.ts
content_copy@Injectable()export class HeroCacheService { hero: Hero; constructor(private heroService: HeroService) {} fetchCachedHero(id: number) { if (!this.hero) { this.hero = this.heroService.getHeroById(id } return this.hero; }}
很明显,这三个 HeroBioComponent 实例不能共享一样的 HeroCacheService。要不然它们会相互冲突,争相把自己的英雄放在缓存里面。
通过在自己的元数据(metadata)providers 数组里面列出 HeroCacheService, 每个 HeroBioComponent 就能拥有自己独立的 HeroCacheService 实例。
src/app/hero-bio.component.ts
content_copy@Component{ selector: 'app-hero-bio', template: ` <h4>{{hero.name}}</h4> <ng-content></ng-content> <textarea cols="25" [(ngModel)]="hero.description"></textarea>`, providers: [HeroCacheService]}) export class HeroBioComponent implements OnInit { @Input() heroId: number; constructor(private heroCache: HeroCacheService) { } ngOnInit() { this.heroCache.fetchCachedHero(this.heroId } get hero() { return this.heroCache.hero; }}
父组件 HeroBiosComponent 把一个值绑定到 heroId。ngOnInit 把该 id传递到服务,然后服务获取和缓存英雄。hero 属性的 getter 从服务里面获取缓存的英雄,并在模板里显示它绑定到属性值。
到在线例子 / 下载范例中找到这个例子,确认三个 HeroBioComponent 实例拥有自己独立的英雄数据缓存。

使用@Optional()和 @Host() 装饰器来限定依赖查找方式
你知道,依赖可以被注入到任何组件级别。
当组件申请一个依赖时,Angular 从该组件本身的注入器开始,沿着依赖注入器的树往上找,直到找到第一个符合要求的提供商。如果 Angular 不能在这个过程中找到合适的依赖,它就会抛出一个错误。
大部分时候,你确实想要这个行为。 但是有时候,需要限制这个(依赖)查找逻辑,且/或提供一个缺失的依赖。 单独或联合使用 @Host 和 @Optional 限定型装饰器,就可以修改 Angular 的查找行为。
当 Angular 找不到依赖时,@Optional 装饰器会告诉 Angular 继续执行。Angular 把此注入参数设置为 null(而不用默认的抛出错误的行为)。
@Host 装饰器将把往上搜索的行为截止在宿主组件
宿主组件通常是申请这个依赖的组件。但当这个组件被投影(projected)进一个父组件后,这个父组件就变成了宿主。 下一个例子会演示第二种情况。
示范
HeroBiosAndContactsComponent 是前面见过的 HeroBiosComponent 的修改版。
src/app/hero-bios.component.ts (HeroBiosAndContactsComponent)
content_copy@Component{ selector: 'app-hero-bios-and-contacts', template: ` <app-hero-bio [heroId]="1"> <app-hero-contact></app-hero-contact> </app-hero-bio> <app-hero-bio [heroId]="2"> <app-hero-contact></app-hero-contact> </app-hero-bio> <app-hero-bio [heroId]="3"> <app-hero-contact></app-hero-contact> </app-hero-bio>`, providers: [HeroService]})export class HeroBiosAndContactsComponent { constructor(logger: LoggerService) { logger.logInfo('Creating HeroBiosAndContactsComponent' }}
注意看模板:
dependency-injection-in-action/src/app/hero-bios.component.ts
content_copytemplate: `
  <app-hero-bio [heroId]="1"> <app-hero-contact></app-hero-contact> </app-hero-bio>
  <app-hero-bio [heroId]="2"> <app-hero-contact></app-hero-contact> </app-hero-bio>
  <app-hero-bio [heroId]="3"> <app-hero-contact></app-hero-contact> </app-hero-bio>`,
在 <hero-bio> 标签中是一个新的 <hero-contact> 元素。Angular 就会把相应的 HeroContactComponent投影(transclude)进 HeroBioComponent 的视图里, 将它放在 HeroBioComponent 模板的 <ng-content> 标签槽里。
src/app/hero-bio.component.ts (template)
content_copytemplate: `
  <h4>{{hero.name}}</h4>
  <ng-content></ng-content>
  <textarea cols="25" [(ngModel)]="hero.description"></textarea>`,
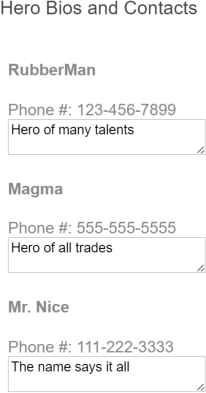
从 HeroContactComponent 获得的英雄电话号码,被投影到上面的英雄描述里,就像这样:

下面的 HeroContactComponent,示范了限定型装饰器(@Optional 和@Host):
src/app/hero-contact.component.ts
content_copy@Component{ selector: 'app-hero-contact', template: ` <div>Phone #: {{phoneNumber}} <span *ngIf="hasLogger">!!!</span></div>`})export class HeroContactComponent { hasLogger = false; constructor( @Host() // limit to the host component's instance of the HeroCacheService private heroCache: HeroCacheService, @Host() // limit search for logger; hides the application-wide logger @Optional() // ok if the logger doesn't exist private loggerService: LoggerService ) { if (loggerService) { this.hasLogger = true; loggerService.logInfo('HeroContactComponent can log!' } } get phoneNumber() { return this.heroCache.hero.phone; } }
注意看构造函数的参数:
src/app/hero-contact.component.ts
content_copy@Host() // limit to the host component's instance of the HeroCacheService
private heroCache: HeroCacheService,

@Host()     // limit search for logger; hides the application-wide logger
@Optional() // ok if the logger doesn't exist
private loggerService: LoggerService
@Host() 函数是 heroCache 属性的装饰器,确保从其父组件 HeroBioComponent 得到一个缓存服务。如果该父组件不存在这个服务,Angular 就会抛出错误,即使组件树里的再上级有某个组件拥有这个服务,Angular 也会抛出错误。
另一个 @Host() 函数是属性 loggerService 的装饰器。 在本应用程序中只有一个在 AppComponent 级提供的 LoggerService 实例。 该宿主 HeroBioComponent 没有自己的 LoggerService 提供商。
如果没有同时使用 @Optional() 装饰器的话,Angular 就会抛出错误。多亏了 @Optional(),Angular 把 loggerService 设置为 null,并继续执行组件而不会抛出错误。
下面是 HeroBiosAndContactsComponent 的执行结果:

如果注释掉 @Host() 装饰器,Angular 就会沿着注入器树往上走,直到在 AppComponent 中找到该日志服务。日志服务的逻辑加入进来,更新了英雄的显示信息,这表明确实找到了日志服务。

另一方面,如果恢复 @Host() 装饰器,注释掉 @Optional,应用程序就会运行失败,因为它在宿主组件级别找不到需要的日志服务。 EXCEPTION: No provider for LoggerService! (HeroContactComponent -> LoggerService)
注入组件的 DOM 元素
偶尔,可能需要访问一个组件对应的 DOM 元素。尽量避免这样做,但还是有很多视觉效果和第三方工具(比如 jQuery)需要访问 DOM。
要说明这一点,请在属性型指令HighlightDirective 的基础上,编写一个简化版。
src/app/highlight.directive.ts
content_copyimport { Directive, ElementRef, HostListener, Input } from '@angular/core'; @Directive{ selector: '[appHighlight]'})export class HighlightDirective { @Input('appHighlight') highlightColor: string; private el: HTMLElement; constructor(el: ElementRef) { this.el = el.nativeElement; } @HostListener('mouseenter') onMouseEnter() { this.highlight(this.highlightColor || 'cyan' } @HostListener('mouseleave') onMouseLeave() { this.highlight(null } private highlight(color: string) { this.el.style.backgroundColor = color; }}
当用户把鼠标移到 DOM 元素上时,指令将该元素的背景设置为一个高亮颜色。
Angular 把构造函数参数 el 设置为注入的 ElementRef,该 ElementRef代表了宿主的 DOM 元素, 它的 nativeElement 属性把该 DOM 元素暴露给了指令。
下面的代码把指令的 myHighlight 属性(Attribute)填加到两个 <div> 标签里,一个没有赋值,一个赋值了颜色。
src/app/app.component.html (highlight)
content_copy<div id="highlight"  class="di-component"  appHighlight>
  <h3>Hero Bios and Contacts</h3>
  <div appHighlight="yellow">
    <app-hero-bios-and-contacts></app-hero-bios-and-contacts>
  </div>
</div>
下图显示了鼠标移到 <hero-bios-and-contacts> 标签的效果:

使用提供商来定义依赖
本节将演示如何编写提供商来提供被依赖的服务。
给依赖注入器提供令牌来获取服务。
你通常在构造函数里面,为参数指定类型,让 Angular 来处理依赖注入。该参数类型就是依赖注入器所需的令牌。 Angular 把该令牌传给注入器,然后把得到的结果赋给参数。下面是一个典型的例子:
src/app/hero-bios.component.ts (component constructor injection)
content_copyconstructor(logger: LoggerService) {
  logger.logInfo('Creating HeroBiosComponent'
}
Angular 向注入器请求与 LoggerService 对应的服务,并将返回值赋给 logger 参数。
注入器从哪得到的依赖? 它可能在自己内部容器里已经有该依赖了。 如果它没有,也能在提供商的帮助下新建一个。 提供商就是一个用于交付服务的配方,它被关联到一个令牌。
如果注入器无法根据令牌在自己内部找到对应的提供商,它便将请求移交给它的父级注入器,这个过程不断重复,直到没有更多注入器为止。 如果没找到,注入器就抛出一个错误...除非这个请求是可选的。
新建的注入器中没有提供商。 Angular 会使用一些自带的提供商来初始化这些注入器。你必须自行注册属于自己的提供商,通常会在该服务的 @Injectable 装饰器中,或在 NgModule 或 Directive 元数据的 providers 数组中进行注册。
src/app/app.component.ts (providers)
content_copyproviders: [ LoggerService, UserContextService, UserService ]
定义提供商
建议直接在服务类的 @Injectable 装饰器中定义服务提供商。
src/app/heroes/hero.service.0.ts
content_copyimport { Injectable } from '@angular/core';

@Injectable{
  providedIn: 'root',
})
export class HeroService {
  constructor() { }
}
备选方案是在 @NgModule 的 providers 数组中引用下这个类就可以了。
src/app/hero-bios.component.ts (class provider)
content_copyproviders: [HeroService]
注册类提供商之所以这么简单,是因为最常见的可注入服务就是一个类的实例。 但是,并不是所有的依赖都只要创建一个类的新实例就可以交付了。你还需要其它的交付方式,这意味着你也要用其它方式来指定提供商。
HeroOfTheMonthComponent 例子示范了一些替代方案,展示了为什么需要它们。 它看起来很简单:一些属性和一个日志输出。

这段代码的背后有很多值得深入思考的地方。
hero-of-the-month.component.ts
content_copyimport { Component, Inject } from '@angular/core'; import { DateLoggerService } from './date-logger.service';import { Hero } from './hero';import { HeroService } from './hero.service';import { LoggerService } from './logger.service';import { MinimalLogger } from './minimal-logger.service';import { RUNNERS_UP, runnersUpFactory } from './runners-up'; @Component{ selector: 'app-hero-of-the-month', templateUrl: './hero-of-the-month.component.html', providers: [ { provide: Hero, useValue: someHero }, { provide: TITLE, useValue: 'Hero of the Month' }, { provide: HeroService, useClass: HeroService }, { provide: LoggerService, useClass: DateLoggerService }, { provide: MinimalLogger, useExisting: LoggerService }, { provide: RUNNERS_UP, useFactory: runnersUpFactory(2), deps: [Hero, HeroService] } ]})export class HeroOfTheMonthComponent { logs: string[] = []; constructor( logger: MinimalLogger, public heroOfTheMonth: Hero, @Inject(RUNNERS_UP) public runnersUp: string, @Inject(TITLE) public title: string) { this.logs = logger.logs; logger.logInfo('starting up' }}
provide 对象
该 provide 对象需要一个令牌和一个定义对象。该令牌通常是一个类,但并非一定是
该定义对象有一个必填属性(即 useValue),用来标识该提供商会如何新建和返回该服务的单例对象。
useValue - *值-提供商
把一个*固定的值,也就是该提供商可以将其作为依赖对象返回的值,赋给 useValue 属性。
使用该技巧来进行运行期常量设置,比如网站的基础地址和功能标志等。 你通常在单元测试中使用值-提供商,用一个假的或模仿的(服务)来取代一个生产环境的服务。
HeroOfTheMonthComponent 例子有两个值-提供商。 第一个提供了一个 Hero 类的实例;第二个指定了一个字符串资源:
dependency-injection-in-action/src/app/hero-of-the-month.component.ts
content_copy{ provide: Hero,          useValue:    someHero },
{ provide: TITLE,         useValue:   'Hero of the Month' },
Hero 提供商的令牌是一个类,这很合理,因为它提供的结果是一个 Hero实例,并且被注入该英雄的消费者也需要知道它类型信息。
TITLE 提供商的令牌不是一个类。它是一个特别类型的提供商查询键,名叫InjectionToken. 你可以把 InjectionToken 用作任何类型的提供商的令牌,但是它在依赖是简单类型(比如字符串、数字、函数)时会特别有帮助。
一个值-提供商的值必须要立即定义。不能事后再定义它的值。很显然,标题字符串是立刻可用的。 该例中的 someHero 变量是以前在下面这个文件中定义的:
dependency-injection-in-action/src/app/hero-of-the-month.component.ts
content_copyconst someHero = new Hero(42, 'Magma', 'Had a great month!', '555-555-5555'
其它提供商只在需要注入它们的时候才创建并惰性加载它们的值。
useClass - 类-提供商
userClass 提供商创建并返回一个指定类的新实例。
使用该技术来为公共或默认类提供备选实现。该替代品能实现一个不同的策略,比如拓展默认类或者在测试的时候假冒真实类。
请看下面 HeroOfTheMonthComponent 里的两个例子:
dependency-injection-in-action/src/app/hero-of-the-month.component.ts
content_copy{ provide: HeroService,   useClass:    HeroService },
{ provide: LoggerService, useClass:    DateLoggerService },
第一个提供商是展开了语法糖的,是一个典型情况的展开。一般来说,被新建的类(HeroService)同时也是该提供商的注入令牌。 这里用完整形态来编写它,来反衬更受欢迎的缩写形式。
第二个提供商使用 DateLoggerService 来满足 LoggerService。该 LoggerService 在 AppComponent 级别已经被注册。当这个组件要求 LoggerService 的时候,它得到的却是 DateLoggerService 服务。
这个组件及其子组件会得到 DateLoggerService 实例。这个组件树之外的组件得到的仍是 LoggerService 实例。
DateLoggerService 从 LoggerService 继承;它把当前的日期/时间附加到每条信息上。
src/app/date-logger.service.ts
content_copy@Injectable()
export class DateLoggerService extends LoggerService
{
  logInfo(msg: any)  { super.logInfo(stamp(msg) }
  logDebug(msg: any) { super.logInfo(stamp(msg) }
  logError(msg: any) { super.logError(stamp(msg) }
}

function stamp(msg: any) { return msg + ' at ' + new Date( }
useExisting - 别名-提供商
使用 useExisting,提供商可以把一个令牌映射到另一个令牌上。实际上,第一个令牌是第二个令牌所对应的服务的一个别名,创造了访问同一个服务对象的两种方法。
dependency-injection-in-action/src/app/hero-of-the-month.component.ts
content_copy{ provide: MinimalLogger, useExisting: LoggerService },
通过使用别名接口来把一个 API 变窄,是一个很重要的该技巧的使用例子。下面的例子中使用别名就是为了这个目的。
想象一下如果 LoggerService 有个很大的 API 接口(虽然它其实只有三个方法,一个属性),通过使用 MinimalLogger类-接口别名,就能成功的把这个 API 接口缩小到只暴露两个成员:
src/app/minimal-logger.service.ts
content_copy// Class used as a "narrowing" interface that exposes a minimal logger
// Other members of the actual implementation are invisible
export abstract class MinimalLogger {
  logs: string[];
  logInfo: (msg: string) => void;
}
现在,在一个简化版的 HeroOfTheMonthComponent 中使用它。
src/app/hero-of-the-month.component.ts (minimal version)
content_copy@Component{
  selector: 'app-hero-of-the-month',
  templateUrl: './hero-of-the-month.component.html',
  // TODO: move this aliasing, `useExisting` provider to the AppModule
  providers: [{ provide: MinimalLogger, useExisting: LoggerService }]
})
export class HeroOfTheMonthComponent {
  logs: string[] = [];
  constructor(logger: MinimalLogger) {
    logger.logInfo('starting up'
  }
}
HeroOfTheMonthComponent 构造函数的 logger 参数是一个 MinimalLogger类型,支持 TypeScript 的编辑器里,只能看到它的两个成员 logs 和 logInfo:

实际上,Angular 确实想把 logger 参数设置为注入器里 LoggerService的完整版本。只是在之前的提供商注册里使用了 useClass, 所以该完整版本被 DateLoggerService 取代了。
在下面的图片中,显示了日志日期,可以确认这一点:

useFactory - 工厂-提供商
useFactory 提供商通过调用工厂函数来新建一个依赖对象,如下例所示。
dependency-injection-in-action/src/app/hero-of-the-month.component.ts
content_copy{ provide: RUNNERS_UP, useFactory: runnersUpFactory(2), deps: [Hero, HeroService] }
使用这项技术,可以用包含了一些依赖服务和本地状态输入的工厂函数来建立一个依赖对象。
该依赖对象不一定是一个类实例。它可以是任何东西。在这个例子里,依赖对象是一个字符串,代表了本月英雄比赛的亚军的名字。
本地状态是数字 2,该组件应该显示的亚军的个数。它就会立刻用 2 来执行 runnersUpFactory。
runnersUpFactory 自身不是提供商工厂函数。真正的提供商工厂函数是 runnersUpFactory 返回的函数。
runners-up.ts (excerpt)
content_copyexport function runnersUpFactory(take: number) {
  return (winner: Hero, heroService: HeroService): string => {
    /* ... */
  };
};
这个返回的函数需要一个 Hero 和一个 HeroService 参数。
Angular 通过使用 deps 数组中的两个令牌,来识别注入的值,用来提供这些参数。这两个 deps 值是供注入器使用的令牌,用来提供工厂函数的依赖。
一些内部工作后,这个函数返回名字字符串,Angular 将其注入到 HeroOfTheMonthComponent 组件的 runnersUp 参数里。
该函数从 HeroService 获取英雄参赛者,从中取 2 个作为亚军,并把他们的名字拼接起来。请到在线例子 / 下载范例查看全部原代码。
备选提供商令牌:类-接口和 InjectionToken
Angular 依赖注入当令牌是类的时候是最简单的,该类同时也是返回的依赖对象的类型(通常直接称之为服务)。
但令牌不一定都是类,就算它是一个类,它也不一定都返回类型相同的对象。这是下一节的主题。
类-接口
前面的月度英雄的例子使用了 MinimalLogger 类作为 LoggerService 提供商的令牌。
dependency-injection-in-action/src/app/hero-of-the-month.component.ts
content_copy{ provide: MinimalLogger, useExisting: LoggerService },
该 MinimalLogger 是一个抽象类。
dependency-injection-in-action/src/app/minimal-logger.service.ts
content_copy// Class used as a "narrowing" interface that exposes a minimal logger
// Other members of the actual implementation are invisible
export abstract class MinimalLogger {
  logs: string[];
  logInfo: (msg: string) => void;
}
你通常从一个抽象类继承。但这个应用中并没有类会继承 MinimalLogger。
LoggerService 和 DateLoggerService本可以从 MinimalLogger 中继承。 它们也可以实现 MinimalLogger,而不用单独定义接口。 但它们没有。MinimalLogger 在这里仅仅被用作一个 "依赖注入令牌"。
这种用法的类叫做类-接口。它关键的好处是:提供了接口的强类型,能像正常类一样把它当做提供商令牌使用。
类-接口应该只定义允许它的消费者调用的成员。窄的接口有助于解耦该类的具体实现和它的消费者。
为什么 MinimalLogger 是一个类而不是一个 TypeScript 接口
不能把接口当做提供商的令牌,因为接口不是有效的 JavaScript 对象。 它们只存在在 TypeScript 的设计空间里。它们会在被编译为 JavaScript 之后消失。
一个提供商令牌必须是一个真实的 JavaScript 对象,比如:一个函数,一个对象,一个字符串,或一个类。
把类当做接口使用,可以为你在一个 JavaScript 对象上提供类似于接口的特性。
当然,一个真实的类会占用内存。为了节省内存占用,该类应该没有具体的实现。MinimalLogger 会被转译成下面这段没有优化过的,尚未最小化的 JavaScript:
dependency-injection-in-action/src/app/minimal-logger.service.ts
content_copyvar MinimalLogger = (function () {
  function MinimalLogger() {}
  return MinimalLogger;
}()
exports("MinimalLogger", MinimalLogger
注意,只要不实现它,不管添加多少成员,它永远不会增长大小。
InjectionToken 值
依赖对象可以是一个简单的值,比如日期,数字和字符串,或者一个无形的对象,比如数组和函数。
这样的对象没有应用程序接口,所以不能用一个类来表示。更适合表示它们的是:唯一的和符号性的令牌,一个 JavaScript 对象,拥有一个友好的名字,但不会与其它的同名令牌发生冲突。
InjectionToken 具有这些特征。在Hero of the Month例子中遇见它们两次,一个是 title 的值,一个是 runnersUp 工厂提供商。
dependency-injection-in-action/src/app/hero-of-the-month.component.ts
content_copy{ provide: TITLE,         useValue:   'Hero of the Month' },
{ provide: RUNNERS_UP,    useFactory:  runnersUpFactory(2), deps: [Hero, HeroService] }
这样创建 TITLE 令牌:
dependency-injection-in-action/src/app/hero-of-the-month.component.ts
content_copyimport { InjectionToken } from '@angular/core';

export const TITLE = new InjectionToken<string>('title'
类型参数,虽然是可选的,但可以向开发者和开发工具传达类型信息。 而且这个令牌的描述信息也可以为开发者提供帮助。
注入到派生类
当编写一个继承自另一个组件的组件时,要格外小心。如果基础组件有依赖注入,必须要在派生类中重新提供和重新注入它们,并将它们通过构造函数传给基类。
在这个刻意生成的例子里,SortedHeroesComponent 继承自 HeroesBaseComponent,显示一个被排序的英雄列表。

HeroesBaseComponent 能自己独立运行。它在自己的实例里要求 HeroService,用来得到英雄,并将他们按照数据库返回的顺序显示出来。
src/app/sorted-heroes.component.ts (HeroesBaseComponent)
content_copy@Component{ selector: 'app-unsorted-heroes', template: `<div *ngFor="let hero of heroes">{{hero.name}}</div>`, providers: [HeroService]})export class HeroesBaseComponent implements OnInit { constructor(private heroService: HeroService) { } heroes: Array<Hero>; ngOnInit() { this.heroes = this.heroService.getAllHeroes( this.afterGetHeroes( } // Post-process heroes in derived class override. protected afterGetHeroes() {} }
让构造函数保持简单。它们只应该用来初始化变量。 这条规则用于在测试环境中放心的构造组件,以免在构造它们时,无意做了一些非常戏剧化的动作(比如与服务器进行会话)。 这就是为什么你要在 ngOnInit 里面调用 HeroService,而不是在构造函数中。
用户希望看到英雄按字母顺序排序。与其修改原始的组件,不如派生它,新建 SortedHeroesComponent,以便展示英雄之前进行排序。SortedHeroesComponent 让基类来获取英雄。
可惜,Angular 不能直接在基类里直接注入 HeroService。必须在这个组件里再次提供 HeroService,然后通过构造函数传给基类。
src/app/sorted-heroes.component.ts (SortedHeroesComponent)
content_copy@Component{ selector: 'app-sorted-heroes', template: `<div *ngFor="let hero of heroes">{{hero.name}}</div>`, providers: [HeroService]})export class SortedHeroesComponent extends HeroesBaseComponent { constructor(heroService: HeroService) { super(heroService } protected afterGetHeroes() { this.heroes = this.heroes.sort((h1, h2) => { return h1.name < h2.name ? -1 : (h1.name > h2.name ? 1 : 0 } }}
现在,请注意 afterGetHeroes() 方法。 你的第一反应是在 SortedHeroesComponent 组件里面建一个 ngOnInit 方法来做排序。但是 Angular 会先调用派生类的 ngOnInit,后调用基类的 ngOnInit, 所以可能在英雄到达之前就开始排序。这就产生了一个讨厌的错误。
覆盖基类的 afterGetHeroes() 方法可以解决这个问题。
分析上面的这些复杂性是为了强调避免使用组件继承这一点。
通过注入来找到一个父组件
应用程序组件经常需要共享信息。使用松耦合的技术会更好一点,比如数据绑定和服务共享。 但有时候组件确实需要拥有另一个组件的引用,用来访问该组件的属性值或者调用它的方法。
在 Angular 里,获取一个组件的引用比较复杂。虽然 Angular 应用程序是一个组件树,但它没有公共 API 来在该树中巡查和穿梭。
有一个 API 可以获取子级的引用(请看API 参考手册中的 Query, QueryList, ViewChildren,和 ContentChildren)。
但没有公共 API 来获取父组件的引用。但是因为每个组件的实例都被加到了依赖注入器的容器中,可以使用 Angular 依赖注入来找到父组件。
本章节描述了这项技术。
找到已知类型的父组件
你使用标准的类注入来获取已知类型的父组件。
在下面的例子中,父组件 AlexComponent 有几个子组件,包括 CathyComponent:
parent-finder.component.ts (AlexComponent v.1)
content_copy@Component{
  selector: 'alex',
  template: `
    <div class="a">
      <h3>{{name}}</h3>
      <cathy></cathy>
      <craig></craig>
      <carol></carol>
    </div>`,
})
export class AlexComponent extends Base
{
  name = 'Alex';
}
在注入AlexComponent` 进来后,Cathy 报告它是否对 Alex* 有访问权:
parent-finder.component.ts (CathyComponent)
content_copy@Component{
  selector: 'cathy',
  template: `
  <div class="c">
    <h3>Cathy</h3>
    {{alex ? 'Found' : 'Did not find'}} Alex via the component class.<br>
  </div>`
})
export class CathyComponent {
  constructor( @Optional() public alex: AlexComponent ) { }
}
注意,这里为安全起见而添加了@Optional装饰器,在线例子 / 下载范例显示 alex 参数确实被设置了。
无法通过它的基类找到一个父级
如果不知道具体的父组件类名怎么办?
一个可复用的组件可能是多个组件的子级。想象一个用来渲染金融工具头条新闻的组件。由于商业原因,该新闻组件在实时变化的市场数据流过时,要频繁的直接调用其父级工具。
该应用程序可能有多于一打的金融工具组件。如果幸运,它们可能会从同一个基类派生,其 API 是 NewsComponent 组件所能理解的。
更好的方式是通过接口来寻找实现了它的组件。但这是不可能的,因为 TypeScript 的接口在编译成 JavaScript 以后就消失了,JavaScript 不支持接口。没有东西可查。
这并不是好的设计。问题是一个组件是否能通过它父组件的基类来注入它的父组件呢?
CraigComponent 例子探究了这个问题。[往回看 Alex]{guide/dependency-injection-in-action#alex},你看到 Alex 组件扩展(派生)自一个叫 Base 的类。
parent-finder.component.ts (Alex class signature)
content_copyexport class AlexComponent extends Base
CraigComponent 试图把 Base 注入到到它的 alex 构造函数参数,来报告是否成功。
parent-finder.component.ts (CraigComponent)
content_copy@Component{
  selector: 'craig',
  template: `
  <div class="c">
    <h3>Craig</h3>
    {{alex ? 'Found' : 'Did not find'}} Alex via the base class.
  </div>`
})
export class CraigComponent {
  constructor( @Optional() public alex: Base ) { }
}
可惜这样不行。在线例子 / 下载范例显示 alex 参数是 null。 不能通过基类注入父组件。
通过类-接口找到父组件
可以通过类-接口找到一个父组件。
该父组件必须通过提供一个与类-接口令牌同名的别名来与之合作。
请记住 Angular 总是从它自己的注入器添加一个组件实例;这就是为什么在之前可以 Alex 注入到 Carol。
编写一个别名提供商 &mdash;一个拥有 useExisting 定义的 provide 函数 — 它新建一个备选的方式来注入同一个组件实例,并把这个提供商添加到 AlexComponent 的 @Component 元数据里的 providers 数组。
parent-finder.component.ts (AlexComponent providers)
content_copyproviders: [{ provide: Parent, useExisting: forwardRef(() => AlexComponent) }],
Parent是该提供商的类-接口令牌。AlexComponent 引用了自身,造成循环引用,使用forwardRef打破了该循环。
Carol,Alex 的第三个子组件,把父级注入到了自己的 parent 参数,和之前做的一样:
parent-finder.component.ts (CarolComponent class)
content_copyexport class CarolComponent {
  name = 'Carol';
  constructor( @Optional() public parent: Parent ) { }
}
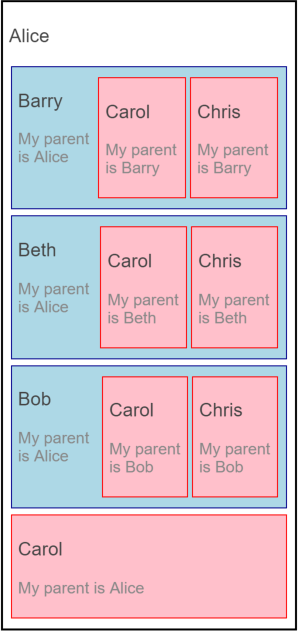
下面是 Alex 和其家庭的运行结果:

通过父级树找到父组件
想象组件树中的一个分支为:Alice -> Barry -> Carol。Alice 和 Barry都实现了这个 Parent类-接口。
Barry 是个问题。它需要访问它的父组件 Alice,但同时它也是 Carol 的父组件。这个意味着它必须同时注入Parent类-接口来获取 Alice,和提供一个 Parent 来满足 Carol。
下面是 Barry 的代码:
parent-finder.component.ts (BarryComponent)
content_copyconst templateB = `
  <div class="b">
    <div>
      <h3>{{name}}</h3>
      <p>My parent is {{parent?.name}}</p>
    </div>
    <carol></carol>
    <chris></chris>
  </div>`;

@Component{
  selector:   'barry',
  template:   templateB,
  providers:  [{ provide: Parent, useExisting: forwardRef(() => BarryComponent) }]
})
export class BarryComponent implements Parent {
  name = 'Barry';
  constructor( @SkipSelf() @Optional() public parent: Parent ) { }
}
Barry 的 providers 数组看起来很像Alex 的那个. 如果准备一直像这样编写别名提供商的话,你应该建立一个辅助函数。
眼下,请注意 Barry 的构造函数:
Barry's constructor
Carol's constructor
content_copyconstructor( @SkipSelf() @Optional() public parent: Parent ) { }
除额外添加了一个的 @SkipSelf 外,它和 Carol 的构造函数一样。
添加 @SkipSelf 主要是出于两个原因:
- 它告诉注入器从一个在自己
上一级的组件开始搜索一个Parent依赖。
这里是 Alice,Barry 和该家庭的操作演示:

Parent 类-接口
你以前学过:类-接口是一个抽象类,被当成一个接口使用,而非基类。
这个例子定义了一个 Parent类-接口。
parent-finder.component.ts (Parent class-interface)
content_copyexport abstract class Parent { name: string; }
该 Parent类-接口定义了 Name 属性,它有类型声明,但是没有实现,该 name 是该父级的所有子组件们唯一能调用的属性。 这种“窄接口”有助于解耦子组件类和它的父组件。
一个能用做父级的组件应该实现类-接口,和下面的 AliceComponent 的做法一样:
parent-finder.component.ts (AliceComponent class signature)
content_copyexport class AliceComponent implements Parent
这样做可以提升代码的清晰度,但严格来说并不是必须的。虽然 AlexComponent 有一个 name 属性(来自 Base 类的要求),但它的类签名并不需要提及 Parent。
parent-finder.component.ts (AlexComponent class signature)
content_copyexport class AlexComponent extends Base
为了正确的代码风格,该 AlexComponent应该实现 Parent。在这个例子里它没有这样,只是为了演示在没有该接口的情况下,该代码仍会被正确编译并运行。
provideParent()助手函数
编写父组件相同的各种别名提供商很快就会变得啰嗦,在用forwardRef的时候尤其绕口:
dependency-injection-in-action/src/app/parent-finder.component.ts
content_copyproviders: [{ provide: Parent, useExisting: forwardRef(() => AlexComponent) }],
可以像这样把该逻辑抽取到一个助手函数里:
dependency-injection-in-action/src/app/parent-finder.component.ts
content_copy// Helper method to provide the current component instance in the name of a `parentType`.
const provideParent =
  (component: any) => {
    return { provide: Parent, useExisting: forwardRef(() => component) };
  };
现在就可以为组件添加一个更简单、直观的父级提供商了:
dependency-injection-in-action/src/app/parent-finder.component.ts
content_copyproviders: [ provideParent(AliceComponent) ]
你可以做得更好。当前版本的助手函数只能为 Parent类-接口提供别名。应用程序可能有很多类型的父组件,每个父组件有自己的类-接口令牌。
下面是一个修改版本,默认接受一个 Parent,但同时接受一个可选的第二参数,可以用来指定一个不同的父级类-接口。
dependency-injection-in-action/src/app/parent-finder.component.ts
content_copy// Helper method to provide the current component instance in the name of a `parentType`.
// The `parentType` defaults to `Parent` when omitting the second parameter.
const provideParent =
  (component: any, parentType?: any) => {
    return { provide: parentType || Parent, useExisting: forwardRef(() => component) };
  };
下面的代码演示了如何使它添加一个不同类型的父级:
dependency-injection-in-action/src/app/parent-finder.component.ts
content_copyproviders: [ provideParent(BethComponent, DifferentParent) ]
使用一个前向引用(forwardRef)来打破循环
在 TypeScript 里面,类声明的顺序是很重要的。如果一个类尚未定义,就不能引用它。
这通常不是一个问题,特别是当你遵循一个文件一个类规则的时候。 但是有时候循环引用可能不能避免。当一个类A 引用类 B,同时'B'引用'A'的时候,你就陷入困境了:它们中间的某一个必须要先定义。
Angular 的 forwardRef() 函数建立一个间接地引用,Angular 可以随后解析。
Parent Finder是一个充满了无法解决的循环引用的例子
当一个类需要引用自身的时候,你面临同样的困境,就像在 AlexComponent 的 provdiers 数组中遇到的困境一样。 该 providers 数组是一个 @Component 装饰器函数的一个属性,它必须在类定义之前出现。
使用 forwardRef 来打破这种循环:
parent-finder.component.ts (AlexComponent providers)
content_copyproviders: [{ provide: Parent, useExisting: forwardRef(() => AlexComponent) }],

